|
Porcelain Tub Restoration
|
|
STEP-2
SEALING DULL AREAS OF TUB
Follow written Instructions closely 1
17. See # 17 on instruction sheet.
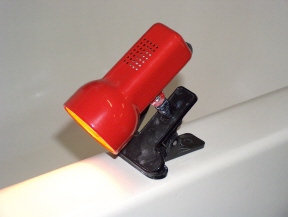
T-1 STEALTH DETECTOR
T-1 HELPS LOCATE DULL AREAS OF TUB Turn off ALL other lights in room to make the inspection for best results! Look for dull areas, do NOT apply products to glossy un-damaged areas
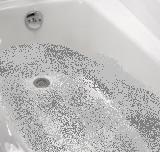
T-1 Stealth will detect any dull areas of the tub
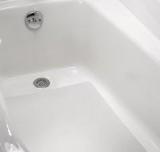
Most tubs are dull ONLY in the bottom and approximately 1/3 up the side walls as shown with the RED ↑ arrows above. Some tubs are NOT worn at all and may have only a few chips. Some tubs are dull all over especially if they have been refinished previously and etched with hydrofluoric acid.
Our goal for each tub restoration is to repair damaged areas, and restore the gloss to worn areas bringing the tub back to its original appearance.
A Like New LOOK, NOT a Painted LOOK!
AFTER MAKING A THOROUGH INSPECTION PROCEED
2
13. See number 13 on instruction sheet. PREPARING APPLICATOR PAD 3 APPLY STEP-2 IN LONG EVEN STROKES If applying Slip-Grip bottom do NOT apply Step-2 immediately, wait until all other surfaces are sealed with Step-2 then apply it to the bottom last. Do NOT apply products to GLOSSY un-damaged areas they will NOT penetrate and bond properly.
4 DRY EACH COAT OF STEP- 2 WITH FAN The tub will soak up a lot of STEP-2 on the first coat and may require several minutes to dry! After the first coat dries to touch, each coat there after will dry in just a few minutes with fan. 5 USE DETECTION LIGHT BETWEEN COATS CAUTION: Each coat must be dry to touch before applying the next coat or the applicator pad will smear the pervious coat making the finish dull and rough. 6 USE WHITE PAD BETWEEN COATS Lightly wipe all treated surfaces to insure any trash, lint etc are removed White pad loosens any trash that might contaminate surface causing a rough finish
7 USE TACK CLOTH BETWEEN COATS Always shake (away from the tub) the Star fiber tack cloth before each use. Wipe lightly to remove any loose trash etc. 8 APPLY EACH COAT AT 90° ANGLE TO LAST COAT
Cross hatch application insures even distribution 9 Apply Step-2 to Slip-Grip Bottom after all other surfaces are sealed Squeeze the applicator pad over slip grip bottom to get as much Step-2 out of the pad as possible Use pad to distribute Step-2 evenly on Slip-Grip bottom
10
USE DETECTION LIGHT BETWEEN COATS
HOW MANY COATS SHOULD I APPLY? When all dull areas have an even semi-gloss look (Not a wet glossy look and Not a dull, flat look it must be semi-gloss look)
PROCEED TO STEP 3
© SPR Product Sales 2012 |